Optimizing React Development: Building Efficient CLI Tools

In the world of React development, we often face new challenges. My goal has always been to make developing easier and more user-friendly, even when things get tough. This goal led me to solve a problem in my work.
Working in a company with three development teams, each managing three or more React projects, I realized we faced a serious challenge. Each time I reviewed their code, I noticed inconsistencies in their work, which required extra time to understand and untangle. This complexity increased as the projects expanded.
This led to the idea of standardization: creating a unified code style document to standardize the way we tackle tasks. Such standardization could help prevent the code review bottlenecks or the stalling during implementation caused by errors or sticking points.
I suggest you take a look at the NodeJS and CLI: Creation Command Line Interface if you’re looking for a step-by-step guide to developing and releasing CLI tools.
Project Structure and Source Code
In this section, I’d like to delve into the React Component Architecture and the importance of standardizing React codebases. A well-organized project structure is not just about neatness; it’s a fundamental aspect of maintaining a scalable and manageable codebase, especially in a dynamic environment.
Efficiency Structure for Clarity
When we look at the standard structure we adopted for our React projects, it becomes clear that this approach not only simplifies development but also ensures consistency and efficiency. Let’s take a closer look:
1
2
3
4
5
ComponentName/
├── children/ # [optional] directory for nested components
├── index.ts # central access point for the component
├── ComponentName.tsx # file containing the component's logic and markup
└── ComponentName.module.css # styling specific to the component
In this structure, every component, such as ComponentName, is organized in its own directory. This directory includes the main component file (ComponentName.ts), its styling (ComponentName.module.css), and an index.ts file for easy integration. If a component has child components, they are neatly housed in a children/ directory. This setup not only streamlines the development process but also aligns with best practices in React development, ensuring our team can efficiently manage and scale our projects.
Visualizing Component Architecture
To further clarify our approach, let’s look at the optimized React component architecture through visual examples. The following picture serves as a great case of how components are structured in our projects, increasing the clarity and efficiency of the development process.
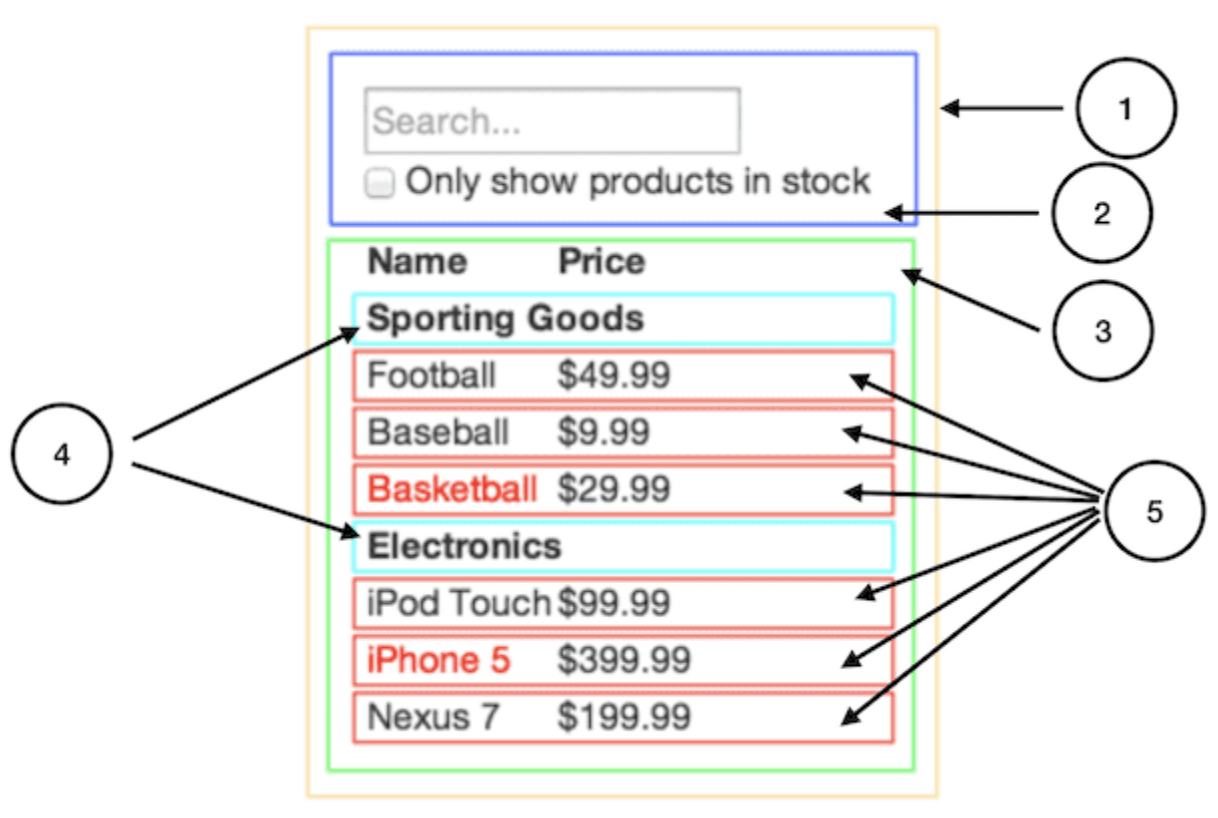 Wire Frame of Component
In this diagram, we break down a typical React component:
FilterableProductTable(orange): contains the entirety of the exampleSearchBar(blue): receives all user inputProductTable(green): displays and filters the data collection based on user inputProductCategoryRow(turquoise): displays a heading for each categoryProductRow(red): displays a row for each product
Every part of this architecture is carefully designed to ensure modularity, isolation and ease of management. Let’s take a look at the internal structure:
1
2
3
4
5
6
7
8
9
10
11
12
13
14
15
16
17
18
19
20
21
22
FilterableProductTable/
├── children/
│   ├── SearchBar/
│   │   ├── index.ts
│   │   ├── SearchBar.tsx
│   │   └── SearchBar.module.css
│   └── ProductTable/
│       ├── children/
│       │   ├── ProductCategoryRow/
│       │   │   ├── index.ts
│       │   │   ├── ProductCategoryRow.tsx
│       │   │   └── ProductCategoryRow.module.css
│       │   └── ProductRow/
│       │       ├── index.ts
│       │       ├── ProductRow.tsx
│       │       └── ProductRow.module.css
│       ├── index.ts
│       ├── ProductTable.tsx
│       └── ProductTable.module.css
├── index.ts
├── FilterableProductTable.tsx
└── FilterableProductTable.module.css
This structured approach not only aligns with React’s component-based philosophy but also ensures our code remains clean, scalable, and intuitive for any developer to understand and engage with.
Implementation Details
In this vital section, we explore the specific elements that are essential in the components we develop. Our solution is designed to significantly boost both the efficiency and the quality of the code. This approach enables developers to move beyond routine tasks, allowing them to concentrate on more specialized and impactful aspects of the project.
Let’s look at a simple example to illustrate this:
1
export { ComponentName } from "./ComponentName";
1
2
3
4
5
6
7
8
import classes from "./ComponentName.module.css";
import React, { FC } from "react";

type ComponentNameProps = {};

export const ComponentName: FC<ComponentNameProps> = (props) => (
	<div className={classes.container}></div>
);
1
2
3
.container {
	display: flex;
}
Identifying Efficiency Roadblocks
In addressing React project workflow efficiency, I identified several roadblocks that were hindering our progress. The main issue was the time-consuming process of creating and configuring new React components from scratch. It was not just about the complexity, but also about the repetitive nature of the task, which was a significant drain on our productivity.
Our CLI tool was developed as a direct response to these challenges. By automating the component creation process, we significantly reduced the time and effort required for these tasks. This efficiency gain allowed our developers to focus on more critical aspects of the project, ultimately speeding up the entire development cycle.
Let’s take a closer look at the issue: Usually, making two React components from scratch takes about 4 minutes. It’s a simple process – you spend about 3 minutes to create the first component and then around 1 minutes to make a copy and change it. But this easy method isn’t quick.
Now, if we start using a CLI tool, the time needed falls dramatically. What took nearly 4 minutes before, now only takes about 20 seconds. That’s a huge difference.
Let’s use the example from the previous part of the article. Building five components one by one can take you about 7 minutes. But with a CLI tool, you can do it in just over a minute. And if you use a command that works with Emmet syntax to lay out the structure, it might only take you about 30 seconds.
Insanity is doing the same thing over and over again and expecting different results. - Albert Einstein
This might seem like a small thing, but it was a big issue for us. Doing the same steps over and over and trying to keep everything looking the same wasn’t fun for anyone. We all wanted something easier – to be able to write many components together in one file without having to follow too many rules. This need for a simpler way led me to make a CLI tool that makes this whole process easier. This tool took away the big hold-up we had in our work. That’s how we started building our own tool.
Why a CLI? Intuitiveness and Convenience in Tool Selection
My decision to use a CLI (Command Line Interface) was heavily influenced by the existing NodeJS and React integration in our workflow. Most of our developers were already familiar with using the command line for various tasks. By adding our tool into this environment, we could provide a solution that was both intuitive and easy to integrate into our existing processes. The CLI approach also allowed for more flexibility and quicker access compared to graphical interfaces, making it a natural choice for our development needs.
Adopting NodeJS as the Foundation for Our CLI Tool
The choice of technology for our CLI tool’s implementation was a pivotal moment in the project. One of the decisive factors was the ability to use NPM as a distribution platform. Since NodeJS and NPM were already installed on all our developers’ computers, opting for NodeJS promised to simplify the distribution process significantly. It enabled us to quickly and effectively share the tool among the team, minimizing the need for additional setups or installations.
Therefore, the decision was clear: our CLI tool would be built on NodeJS and distributed via NPM. This approach not only eased deployment but also allowed us to leverage all the benefits of the NodeJS ecosystem, including its flexibility, powerful libraries, and extensive developer community.
Conclusion
Looking into the future, I realize that the evolution of application development on React is about optimizing processes with innovative tools such as custom CLI solutions or IDE extensions. This project not only improved our current workflow, but also opened up new opportunities to improve efficiency and standardize development. I look forward to further improving our tools and practices and believe that continuous innovation will be the key to success in the ever-changing software development landscape.